Editing |
| The operations of Editing and Inserting require very similar GUIs, and in most cases they may be combined. There are several ways to combine INSERT and UPDATE, one simple way is to use an invalid ID during an INSERT as shown in the figures below. Another simple way is to use a boolean variable so that the program can decide between performing an UPDATE or an INSERT; for instance: |
| InsertAndUpdateGUI.h |
| ... class InsertAndUpdateGUI { public: InsertAndUpdateGUI() { isUpdate = false; // For default, it performs an INSERT } bool isUpdate; ... }; |
INSERT |
| During an SQL INSERT the process does not require any selection; the user may begin the insertion by pushing an insert button as shown below. When the insert button is pressed an object of the Insert Dialog (Insert Form) is created and the new interface is empty because the ID passed to the dialog (form) is invalid. |
UPDATE |
| An SQL UPDATE requires that the user selects the item that he would like to edit. He can use the mouse to select any item from a list view control. When one item is selected the Edit button from the toolbar may become enabled; the user can press the Edit button or double click from the list view control (item activated event). Thus, editing requires that an item is selected before beginning the editing process. Once the user press the edit button or double click an item from a list view control; the program must extract the ID (Primary Key) from the data field of the list view control. Then, the Update Dialog (Update Form) is created; the ID extracted from the list view control must be passed to the Update Dialog. When the Update Dialog opens, the dialog must be pre-filled with the item information using the ID. |
| Tip |
| As the Insert Dialog (Insert Form) and Update Dialog (Update Form) look alike, it is better to combine them and use a neutral name such as: ItemDialog, ItemForm, ClientDialog, ClientForm, etc. |
Making Changes |
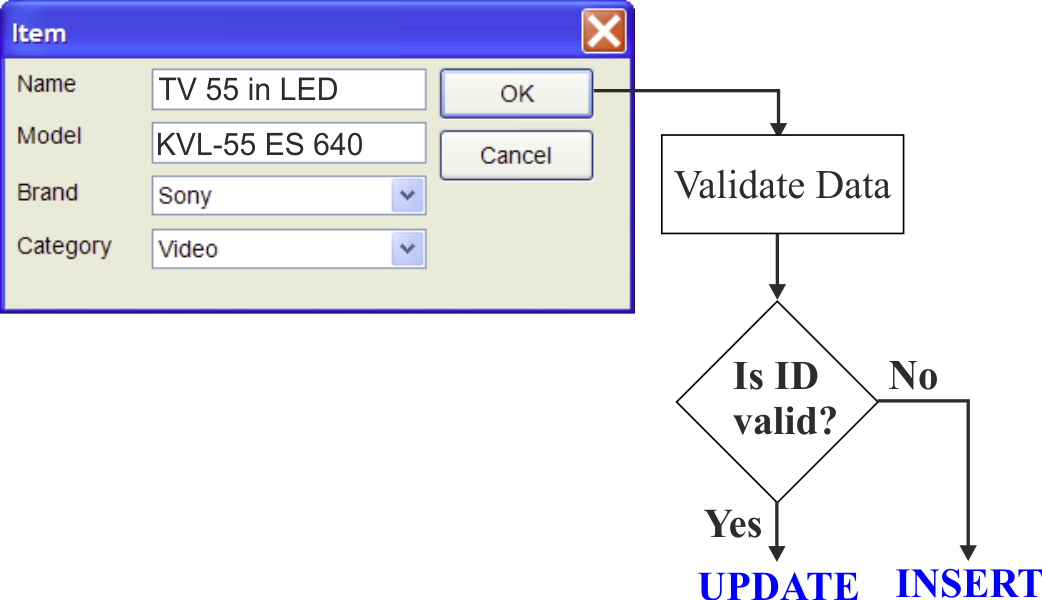
| Once the user is ready to complete the transaction using the OK button, the program must decide between making an UPDATE or an INSERT. The figure below presents a simple method. When the ID is valid, the program performs an UPDATE; when the ID is invalid, the program performs an INSERT. In both cases, data validation (using regular expression or other method) must be performed before executing the UPDATE or the INSERT. Once the Dialog (Form) has been closed, the list view control must be updated to reflect the changes. Instead of using a valid ID to perform an UPDATE, you may use a bool variable to decide between performing an INSERT or an UPDATE. |
| Tip |
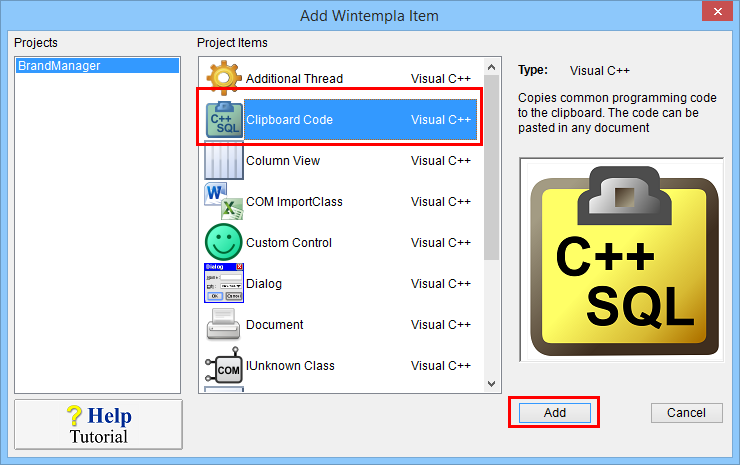
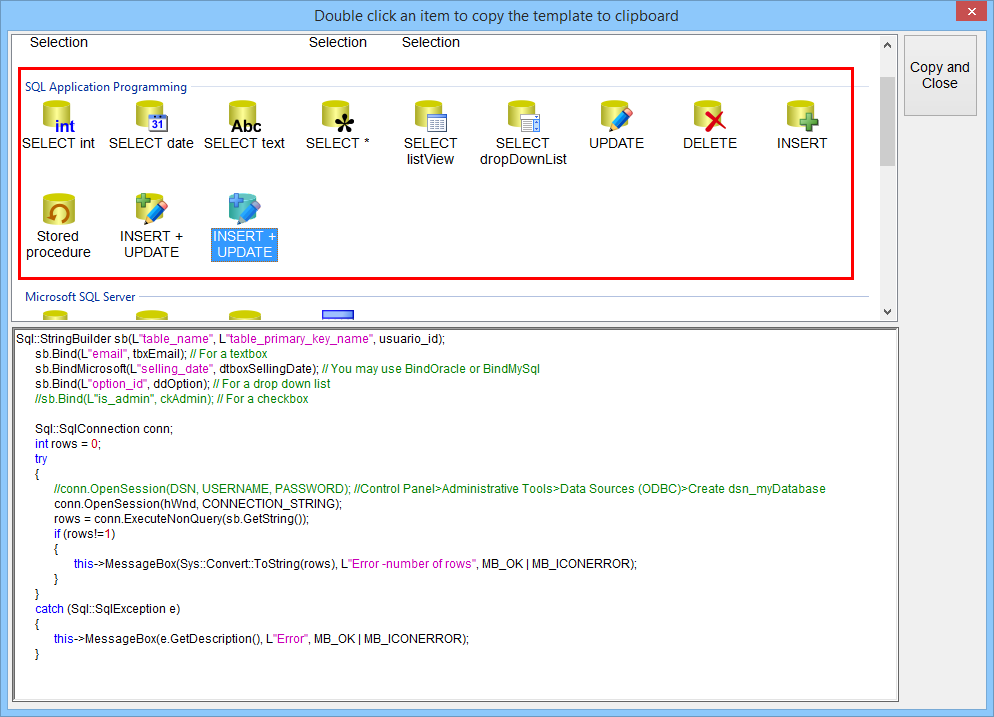
| In a Wintempla project, there are a set of templates, from the menu: Tools > Add Wintempla Item... > Clipboard Code Click the Add button to open the list of templates, then select the Template and click Add. En un proyecto de Wintempla, hay un conjunto de plantilla, desde el menú: Herramientas > Add Wintempla Item... > Clipboard Code Haga clic en el botón de Add, entonces seleccione la plantilla y haga clic en Add. |
| Problem 1 |
| Create a Wintempla project called BrandManager to edit and insert brands. BE SURE to check the "Toolbar Icons" option at the moment to create the application. Do not forget to add the events for the toolbar buttons by making click anywhere in the GUI outside the controls when Wintempla is open, see figure below. You should be able to INSERT and UPDATE a brand using BrandManager. If you do not have the IDM_INSERT event, you can use the IDM_ADD or you can add IDM_INSERT (Resource View > In any of the nodes, right click to open the context menu > Resource Symbols...) If you are an advanced user, you can edit the resource.h file directly to add IDM_INSERT. |

| Step A |
| Edit the BrandManager.h file as shown. |
| Step B |
| Add a new dialog called BrandDlg. In the BrandDlg dialog insert: one label, one textbox and two buttons (OK and Cancel). Set the property of Default button to the OK button. Edit the files BrandDlg.h and BrandDlg.cpp as shown. |
| BrandDlg.h |
| #pragma once //_____________________________________________ BrandDlg.h #include "resource.h" class BrandDlg: public Win::Dialog { public: BrandDlg() { brand_id = -1; } ~BrandDlg() { } int brand_id; private: ... }; |
| BrandDlg.cpp |
| ... void BrandDlg::Window_Open(Win::Event& e) { this->Text = L"Brand"; if(brand_id < 0) return; //________________________________________ 1. It is an INSERT, just return //___________________________________________________________ 2. Create SELECT statement wstring cmd; Sys::Format(cmd, L"SELECT descr FROM brand WHERE brand_id = %d", brand_id); //___________________________________________________________ 3. Execute SELECT Sql::SqlConnection conn; try { //conn.OpenSession(DSN, USERNAME, PASSWORD); //Control Panel>Administrative Tools>Data Sources (ODBC)>Create dsn_myDatabase conn.OpenSession(hWnd, CONNECTION_STRING); conn.ExecuteSelect(cmd); conn.BindColumn(1, tbxBrand, 64); if(conn.Fetch() == false) { this->MessageBox(L"No data was returned", L"Error", MB_OK | MB_ICONERROR); } } catch(Sql::SqlException e) { this->MessageBox(e.GetDescription(), L"Error", MB_OK | MB_ICONERROR); } } void BrandDlg::btOK_Click(Win::Event& e) { //_____________________________________________________ 1. Validate brand name wstring descr = tbxBrand.Text; if (descr.length() < 2) { this->tbxBrand.ShowBalloonTip(L"Brand", L"The brand name must be at least two characters", TTI_ERROR); return; } //_____________________________________________________ 2. Create INSERT or UPDATE statement wstring cmd; if (brand_id < 0) { Sys::Format(cmd, L"INSERT INTO brand (descr) VALUES('%s')", descr.c_str()); } else { Sys::Format(cmd, L"UPDATE brand SET descr='%s' WHERE brand_id=%d", descr.c_str(), brand_id); } //_____________________________________________________ 3. Execute INSERT or UPDATE Sql::SqlConnection conn; int rows = 0; try { //conn.OpenSession(DSN, USERNAME, PASSWORD); //Control Panel>Administrative Tools>Data Sources (ODBC)>Create dsn_myDatabase conn.OpenSession(hWnd, CONNECTION_STRING); rows = conn.ExecuteNonQuery(cmd); if (rows!=1) { this->MessageBox(Sys::Convert::ToString(rows), L"Error -number of rows", MB_OK | MB_ICONERROR); } } catch (Sql::SqlException e) { this->MessageBox(e.GetDescription(), L"Error", MB_OK | MB_ICONERROR); } this->EndDialog(TRUE); } void BrandDlg::btCancel_Click(Win::Event& e) { this->EndDialog(FALSE); } |
| Tip |
| Please take a time to review the function btOK_Click. If the brand_id is negative, an INSERT SQL command is created; otherwise an UPDATE SQL command is created. |
| Step C |
| Edit the BrandManager.cpp file as shown. |
| BrandManager.cpp |
| ... void BrandManager::Window_Open(Win::Event& e) { //________________________________________________________ 1. Column setup lvBrand.Cols.Add(0, LVCFMT_LEFT, 100, L"Name"); //________________________________________________________ 2. Toolbar setup TBBUTTON tbButton[2]; toolbMain.imageList.Create(20, 20, 2); toolbMain.imageList.AddIcon(this->hInstance, IDI_ADD); toolbMain.imageList.AddIcon(this->hInstance, IDI_EDIT); toolbMain.SendMessage(TB_BUTTONSTRUCTSIZE, (WPARAM)(int)sizeof(TBBUTTON), 0); toolbMain.SetImageList(toolbMain.imageList); //_____________________________________ tbButton[0].iBitmap=MAKELONG(0, 0); tbButton[0].idCommand=IDM_INSERT; tbButton[0].fsState=TBSTATE_ENABLED; // | TBSTATE_WRAP tbButton[0].fsStyle=BTNS_BUTTON; tbButton[0].dwData=0L; tbButton[0].iString= (LONG_PTR)L"Add"; //_____________________________________ tbButton[1].iBitmap=MAKELONG(1, 0); tbButton[1].idCommand=IDM_EDIT; tbButton[1].fsState=TBSTATE_ENABLED; // | TBSTATE_WRAP tbButton[1].fsStyle=BTNS_BUTTON; tbButton[1].dwData=0L; tbButton[1].iString= (LONG_PTR)L"Edit"; toolbMain.SetBitmapSize(20, 20); toolbMain.SetButtonSize(24, 22); toolbMain.AddButtons(tbButton, 2);//includes the separator toolbMain.SendMessage(TB_AUTOSIZE, 0, 0); toolbMain.SetMaxTextRows(0); toolbMain.Show(SW_SHOWNORMAL); //________________________________________________________ 3. Disable Edit button in the toolbar ... //________________________________________________________ 4. Display in list view ... } void BrandManager::lvBrand_ItemActivate(Win::Event& e) { EditBrand(); } void BrandManager::lvBrand_ItemChanged(Win::Event& e) { this->toolbMain.EnableButton(IDM_EDIT, lvBrand.GetSelectedCount()==1); } void BrandManager::Cmd_Insert(Win::Event& e) { InsertBrand(); } void BrandManager::Cmd_Edit(Win::Event& e) { EditBrand(); } void BrandManager::InsertBrand() { BrandDlg dlg; dlg.BeginDialog(hWnd); UpdateListView(); } void BrandManager::EditBrand() { LPARAM brand_id; if (lvBrand.GetSelectedData(brand_id) == false) return; BrandDlg dlg; dlg.brand_id = brand_id; dlg.BeginDialog(hWnd); UpdateListView(); } void BrandManager::UpdateListView() { Win::HourGlassCursor hgc(true); toolbMain.EnableButton(IDM_EDIT, false); lvBrand.SetRedraw(false); // SELECT brand_id, descr FROM brand ... try { ... } catch (Sql::SqlException e) { ... } lvBrand.SetRedraw(true); } |
Sql::StringBuilder |
| Wintempla provides the Sql::StringBuilder class that can be used, in some cases, to perform an INSERT or UPDATE. This class builds a SQL statement by directly extracting values from the GUI. In the code shown below, the textbox is associated to the Sql::StringBuilder using the function Bind. The function GetString returns automatically the INSERT or UPDATE command. In most cases, the Sql::StringBuilder class may produce a code that is very easy to read. |
| Problem 2 |
| Modify the previous problem in order to use Sql::StringBuilder and simplify the function implementation. |
| BrandDlg.cpp |
... same as before void BrandDlg::btOK_Click(Win::Event& e) { Sql::StringBuilder sb(L"brand", L"brand_id", brand_id); sb.Bind(L"descr", tbxBrand); Sql::SqlConnection conn; int rows = 0; try { //conn.OpenSession(DSN, USERNAME, PASSWORD); //Control Panel>Administrative Tools>Data Sources (ODBC)>Create dsn_myDatabase conn.OpenSession(hWnd, CONNECTION_STRING); rows = conn.ExecuteNonQuery(sb.GetString()); if (rows!=1) { this->MessageBox(Sys::Convert::ToString(rows), L"Error -number of rows", MB_OK | MB_ICONERROR); } } catch (Sql::SqlException e) { this->MessageBox(e.GetDescription(), L"Error", MB_OK | MB_ICONERROR); } this->EndDialog(TRUE); } |
| Problem 3 |
| Make teams of three people to discuss the Sql::StringBuilder class. Then, prepare a one page document explaining how this class operates; you may use diagrams (including UML diagrams). |